 |
| Sweetness on a tree Ok, Ok Ok! I know, it's after Christmas so why in the world would I post a craft for a Christmas ornament? Well..... I'm real early for next year. :) I absolutely LOVE Christmas time plus I'm extremely behind on my posting and blogging. So here we go! I found this little beauty originally at this site, http://dollarstorecrafts.com/2011/11/make-cupcake-ornaments/. Such a cute idea! I made a ton of these and gave them out as present toppers for teachers, pastors and family. They are incredibly easy (a bit messy) and oh so cute!
Supplies:
Instructions:
First you will need to frost the cupcake. Dribble, paint or drip the white paint onto the ornament ball around the hook. I sat mine inside the container they came in since there was a nice and snug little spot for each ornament. Then I drizzled the white paint all over the tops. This was actually trickier than I thought. The paint pours out very easily and made a bit of a mess. Operator's error.
Next either dip the wet paint into glitter or sprinkle the glitter on the painted area. I left the ornaments in their little container over night to dry completely.
Once dry, glue into the bottom of a small cupcake liner. I found I needed to not just put one dot of glue in the liner but rather glue it all around the ornament so that the liner held snugly to the ornament. I glued mine in off-set or tilted slightly so that the ornament hook wasn't sitting right on top of the cupcake. This way the berry or "cherry" will be on the very top when you glue it.
Then I cut off a faux berry, or "cherry", and glued it next to the ornament hook on top of the cupcake.
Tie a ribbon to the hook and you are ready to go! These turned out to be way cuter than I thought they would!
 |
Thursday, December 27, 2012
Easy Peezy Cupcake Ornaments

The Sweetie-Pie Snowman Guy!
 |
| Snowmen melt my heart! Wow and Holy SMOKES, I can't believe it has been so long since I posted. Ironically, I have been snapping pics and completing projects left and right but have not had the time to sit down, write and post! So here I am now, it's 11:00 at night, the family is sound asleep and I'm sharing with you one of my favorite crafts from this holiday season. The snowmen pictured above are nothing more then a man's tube sock filled with rice, rubber band together and garnished with adorable accessories thanks to my good friend, the glue gun. My 9 year old daughter made one of these guys at her 3rd grade winter party. I immediately fell in love! They are super cute and cheap to make! Who could ask for a better home made present from the kids? I decided right then and there that my daughters would be making and gifting these little guys for Christmas. So the first day of winter break we set off to the dollar store (Dollar Tree to be specific). I adore the dollar store! There are so many fun and awesome things you can find or you may find you can make. There is an amazing website with dollar store ideas that you can check out here http://dollarstorecrafts.com/ (I will be posting another craft I did from this site soon). Now, I didn't find this particular craft there but I have seen this little snowman made in many different ways online. This is just my version.
Supplies:
**** Note: I bought 2 packages of tube socks (12 socks total) and 10 pounds of white rice from Walmart (roughly $2.98 for one 5 lb bag). This made 11 completed snowmen. ****
Instructions:
First, you will want to fill one sock with a cup and a half of rice/bird seed. When I helped the 3rd grade class I had a funnel, however at home I could not find such a miraculous device so I took a paper cup and cut off the bottom of it. Then I slipped it into the top of the sock thus achieving funnel functioning. :)
After filling the sock with a cup and a half of rice/bird seed, use a rubberband to close off the first "snow ball". In other words, wrap the rubberband around the sock at the very top of your snow ball like you are putting hair in a pony tail. This will conclude the bottom of your snowman.
Next fill the sock with 1 cup of rice/bird seed, then wrap a rubberband around this section. This completes the head of the snowman.
Now you will notice you have an extremely long top to your snowman (the top of the tube sock). You will begin to fold down the sock until it meets the head of your snowman to make the hat.
Next you are ready to decorate and bring your little guy to life! I glued a pom pom on top of the hat for decoration, used googly eyes, a pom pom for the nose, buttons down the front and a pipe cleaner for the scarf. There are so many different things you can do to decorate your snowman.
I hope you enjoy making your snowmen as much as we did. They were such a hit with the people that received them as gifts. AND, we have an entire family of Snowmen living out their winter days in our living room. I couldn't be any happier with this project. It is amazingly adorable, incredibly cheap and so so soooo easy!
P.S. The 'Stache......
So I almost forgot the 'Stache-man. How in the world could I have forgot about the 'Stache-man?! The 'stache was inspired by one such snowman from my daughter's 3rd grade class. One boy that I was helping told me he didn't want his to have a scarf but rather a mustache. He proceeded to bend his pipe cleaner into a rather awesome fu-manchu and then asked me to hot glue that baby on! So the 'Stache-man was born! What an awesome idea! I Love kids!
 |
Sunday, November 11, 2012

Wilton Courses are currently 50% off!
Have you ever wanted to learn the art of cake decorating? Now is the perfect time to sign up for Cake Decorating Basics (Course 1). Or if you want to master the art of fondant and gum paste flowers then Course 3 or 4 would be great for you. All of these classes are currently 50% off, making them cost just $22.50 for a 4 week long class!
Or maybe you want to learn more about Cake Pops or how to build a tall/tiered cake? We have those classes as well. Please feel free to check the schedule and ask any questions that you have! Once you are ready to sign up, you can go directly to the store to pay and get your syllabus and course supplies.
Below is the current class schedule for December and January at the Michaels craft store at 1830 Hilliard-Rome Rd Hilliard Ohio.

Sunday, October 14, 2012
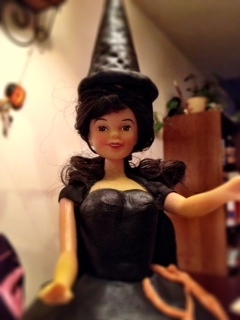
If you follow the link you will notice that their adorable little witch is standing at her "cauldron", the Wilton Melting Pot for candy melts. I didn't add this feature to my design. I did however, follow pretty much everything Wilton calls for. I used the Classic Wonder Mold (pictured below).

Once the cake cooled I leveled it, covered it in buttercream, then covered it again in black fonant. Using fondant is a lot like playing with Pladough. If you are not used to using fondant, then you can cover it in any Halloween colored buttercream (a dark purple would look awesome!). Next I wrapped the dolls body with the fondant. If you aren't using fondant then you could pipe a design onto the doll's body with maybe a star tip or a large round tip, like tip 12. Be creative and play around with it. You could continue the design down the dress also.
For an added touch, which is hard to see on the photo, I covered her dress in purple shimmer color dust. Her arms and face are also colored with green color dust.
Then to make the hat, I covered a waffle cone and cracker in black buttercream and secured them together with melted chocolate. I also piped an orange spider web and spider onto my doll with melted orange candy melts. I am very happy with the end result. She is absolutely adorable!

Make this adorable little cake and you will surely impress any ghoul or ghost this Halloween!
Monday, September 24, 2012
Easy, Peezy Caramel Apples

I LOVE LOVE LOVE September! The weather is cooling down, you can smell Autumn in the air, it's the month of my youngest daughter's birthday AND it marks the beginning of Apple season. My husband and I enjoy taking the girls to an apple orchard, picking our own apples then coming home and cooking up some goodies. Unfortunately, this September is a little different. Here in the Midwest, as in many other areas of the country, our farmer's crops have suffered greatly from this summers horrible drought. Since the apple crop is slim pickins, I decided to shop the orchard in my local produce aisle. :) After collecting a relatively nice bounty, we came home and decided to kick off the Fall season by making up a yummy batch of super easy caramel apples. These are very easy and require very little work but result in a scrumptuous outcome.

Ingredients:
5 Apples of your choice (Most recipes call for Granny Smith but I used Jonathan), stems removed
1 (14 oz) bag of caramels
2 Tablespoons of milk
5 Craft Sticks
Toppings of your choice. Ex: crushed peanuts, sprinkles, chocolate chips, walnuts etc.
Directions:


When the apples are done soaking, remove them from solution and dry them completely. Next insert the craft stickes into the apple.

Next add the unwrapped caramels to a microwave safe container. Then add the milk. Microwave for 4 minutes. I watch them closely and after a couple of minutes I open the microwave and stir them up to keep them from burning. While these are melting, pour your toppings into seperate bowls. Once they have thoroughly melted, remove container from the microwave and dip the apples into the caramel. Cover the apples as much or as little as you like.

Then dip your apple into the topping of your choice. Next set your apples onto the waxed paper lined baking sheet to cook completely.
If you wish to drizzle yours with chocolate as I did, then melt chocolate chips in a zip loc baggie. You will want to microwave for 20 seconds, pull out the bag, knead the bag to mix the chocolate, then microwave again for another 20 seconds. Repeat until thoroughly melted. Next, snip the corner of your baggie and drizzle chocolate over your apples! You can refrigerate to speed up the process or let them sit out to set.
HINT:
Make sure to add the milk to your caramels when melting. If you forget the milk then once the caramel cools it will become as hard as a rock and your yummo-licious apple could potentially break a tooth.
 |
| ENJOY!! |
Tuesday, September 11, 2012
DIY Oatmeal Baggies

Breakfast is the most important meal of the day. By eating breakfast you give your body an advantage. A healthy breakfast keeps you from bottoming out later in the day and succombing to food cravings. When this happens people tend to make unhealthy choices because they are so hungry they need something immediately to ease the hunger pains.
Children also need a healthy start to their day. Children who eat breakfast are more likely to perform better at school than those who skip the meal. They need a lot of healthy food for their growing bodies and learning brains.
While fiddling around on my favorite site to kill time, Pinterest, I came across a woman's blog (http://amylovesherlife.blogspot.com/2012/01/who-likes-saving-money.html) that had such a wonderful idea for a time saving and money saving breakfast! It's so incredibly simple, and I can't believe I didn't think of this before. It was information on how to make your own oatmeal baggies for breakfast! Now, with summer coming to an end, and here in the Midwest, temps are finally cooling down. And with the cooler weather comes the strong desire for "stick to your ribs" type of food. Oatmeal definitely fits the bill. These are so super easy and inexpensive. If you are like me, and love an oatmeal breakfast, then make a batch of these as soon as you can! It makes a ton of oatmeal and costs about what one box of the instant stuff would cost you.

Ingredients:
- One 48 oz. canister of instant oats. (I bought a store brand)
- Light Brown Sugar
- Cinnamon
- Small Zip Loc baggies
I dumped about half of the canister of instant oats into a large mixing bowl. I then put 3/4 cup of brown sugar in the bowl followed by 1 TBSP of Cinnamon. Mix it all up! Then measure out half a cup of the mix and place into Zip Loc baggies. Voila! Oatmeal to go!
Cooking:
Pour one bag of your oatmeal mix into a bowl. Add 3/4-1 Cup of milk or water. Heat it up in the microwave for about 1 min and ENJOY!
Other Versions:
I made a few different versions of oatmeal. I added cinnamon and raisins to one batch and mixed dried fruit to another. Really, you can add or do anything you want! I would love to hear any other combos you have made!
Wednesday, September 5, 2012
The Disappearing Dragee (those silver ball things)

A few weeks ago I made a batch of pretty little cupcakes for my mom and her friends. I decided to use a soft pink buttercream frosting topped with dragees (or as I call them, those silver ball things). Upon searching the entire Columbus Ohio metropolitan area I was only able to find these little evasive decorations at two specialty cake stores! I was honestly surprised. I remember my grandmother decorating cookies with these little beauties. They have been featured in old cookbooks as well as by Martha Stewart not that long ago! I even remember when grocery stores regularly stocked their shelves with them. Their lack of location peaked my interest. I set out to learn more about these mystical orbs and to find a cause for their disappearance.
Let me give you a brief history of the confectionary topping called dragee (pronouced dra-zhay). Some believe that the first dragee was made almost 2,000 years ago by a Roman baker named Julius Dragatus. His early version was simply almonds dipped in honey (sounds delicious!). Fast forward a few hundred years to a town in France called Verdun, where the local druggist was trying to find a way to preserve his almond crop. He devised a plan to coat almonds in a cooked sugar and honey mix.
Many legends arose around dragees. For instance, some believed that these little delights should be served after a meal to promote digestion and rid bad breath. Some also believed they prevented sterility! Soon, people began giving them to family and friends for good luck at events such as weddings and baptisms. Verdun still carries the reputation of the almond dragee to this day.

The Food and Drug administration has declared that them to be inedible. It is believed that at some point in time, these delights contained mercury in them. Of course, now they do not but the FDA still says they are inedible. That is not the same story told in many other countries though. For instance, the United Kingdom still considers them to be a food item. After researching and reading all of these things I thought, "OK, but still what's the big deal? Why do I have to turn every stone in central Ohio to find one precious dragee?" My research led me to surprising findings.
In as early as 1990, a California lawyer set out on a mission to rid California shelves of the dastardly dragee. According to an article I found from SFGate.com (see link below), he got McCormick to remove them completely from all shelves. He filed a lawsuit that alleged the little dragee was toxic (even though there is no record of anyone becoming sick or dying from eating dragees). He claims that the silver can build up in the body causing many health defects over time. If you buy or sell dragees in the state of California, and are caught, you could find yourself in court! Wow! So is that why they are disappearing from shelves across the country as well? I would think so. I believe the disappearance is the result of political pressure in California. How bizarre right? I couldn't believe this! You would have to eat an extremely large number of them in order to have health issues. In the article link below there is a quote from a woman with the California Department of Health Services. She says, "We are not aware of any health problems associated with this product. Levels of the metal are extremely low -- you'd have to consume massive quantities. We don't know how much." Duh! Enough said! Not to mention all of the other toxic things that are put in our food product that the FDA approves such as BPA! Canada is the first country to declare BPA as a toxin. But that's a whole different post!
So if you are ever in need of the pretty little dragee, I suggest ordering them online (unless you are in California because merchants won't ship to Cali zip codes) OR find a specialty cake store that sells them. You unfortunately won't find the metal coated dragees at any craft store. We constantly encounter Michaels crafts customers on the hunt for these little guys.
Happy Baking!
http://ezinearticles.com/?Dragees,-A-French-Touch-For-Your-Next-Event&id=1541421
http://en.wikipedia.org/wiki/Drag%C3%A9e
http://www.sfgate.com/bayarea/article/Bay-Area-faces-holidays-without-little-silver-2508262.php
http://www.fda.gov/food/foodingredientspackaging/ucm166145.htm
http://en.wikipedia.org/wiki/Bisphenol_A
Subscribe to:
Posts (Atom)